Ordering and Installing Maps, Globes, and Components
Thank you for choosing Nystrom Education for your classroom maps and globes. This page will assist you in ordering the right map components and accessories, and it will provide guidance for installing your maps. It also shows the mounting choices we offer for globes.
- What You Get When You Order Roll-Down Maps
- What You Need When You Order Roll-Down Maps
- What You Get When You Order Tripod Maps
- Roll-Down Options for Tripod Maps
- Additional Accessories
- Installing Roll-Down Maps
- Using and Maintaining Your Roll-Down Maps
- Three Choices for Mounting Globes
What You Get When You Order Roll-Down Maps
When you order a roll-down map or map set, it comes on a spring roller with a backboard. The maps are attached to the spring roller, and the spring roller is attached to the backboard.
What You Need When You Order Roll-Down Maps
You cannot safely attach a map backboard directly to a wall. Between the backboard and the wall, you need either a one-inch map rail or a map rack. Map rails also require map hooks.
Map Rails and Map Hooks
Most schools attach maps to the wall using a map rail. Nystrom’s map rails come in six-foot lengths and consist of one-inch-wide 18-gauge steel channels with tan cork.
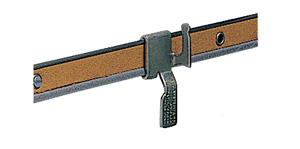
Many classrooms already have a map rail on the wall. If your wall has a one-inch map rail, you can attach your map or map set to the existing rail by using two one-inch map hooks. If you already have a two-inch map rail on the wall, you can attach your map or map set to the existing rail by using two two-inch map hooks. The map hooks will fit onto the map rail and into slots that exist in your map’s backboard.
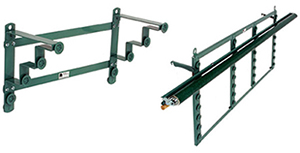
Map Racks
Map racks are an alternative method for attaching your maps to the wall. Map racks do not require map hooks. Instead, the channel in your map or map set’s backboard slides directly onto steel buttons that are part of the rack.
Two types of map racks are available. A four-map rack comes in a stepped configuration that permits up to four maps or map sets to hang one in front of the other, each a little farther out from the wall. The dimensions of the four-map rack are 19″ wide x 11″ high x 8″ deep. An eight-map rack comes in a slanted configuration that can hang up to eight tiers of maps. The eight-map rack also allows maps to be hung side by side. The dimensions of the eight-map rack are 44″ wide x 22″ high x 5½” deep at the top.
Additional Tools and Hardware
You will need additional tools and hardware to install your maps: screws, a drill, measuring tools, markers, and a ladder or scaffold. See the installation instructions below for details.
What You Get When You Order Tripod Maps
Nystrom map sets on tripods come to you complete, needing only minor assembly.
Map sets on tripods do not come as roll-down maps on spring rollers with backboards. They come instead on chart heads that hold the maps together, and you flip the maps back over the chart head to display the map you want students to see.
Assembly consists only of inserting the tripod’s tip into the chart head.
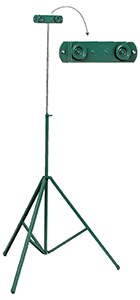
Roll-Down Options for Tripod Maps
Any roll-down map or map set (up to 16 maps) can be mounted on a tripod instead of a wall. Customers can order a map set that comes on a spring roller attached to a backboard. That backboard can then be attached to the tripod by means of an adapter. In addition to your map or map set, you will need to order the tripod and the adapter.
Please note that we do not recommend putting our wide geography maps or social studies charts on tripod stands. History maps are narrower than our geography maps and balance well on tripods, especially in our standard chart head configurations. Roll-down maps on tripod stands can easily become unbalanced when tugged to roll the maps down, especially when they are wide geography maps, but this lack of stability can even apply to roll-down history maps on tripods. We do not recommend putting roll-down maps on tripods. We recommend that you stick to our standard configurations.
Additional Accessories
Markers
Nystrom maps and globes are markable to facilitate active learning. Most water-soluble markers can be used, but you should always test a new marker in an unobtrusive spot to make sure it wipes away completely. Nystrom supplies two types of markers: fine-tip and wide-tip.

Stands
Disc-based stands are available for maps and globes. These stands adjust from 26½” to 42″ high.

Projection Sheets and Projection Screens
Map sets that include maps of more than one size (as is common with state/U.S./world map combos, for instance) may require an additional blank white “projection sheet” that protects the surfaces of larger map sheets from being abraded by their contact with the smaller sheets. These projection sheets are automatically included in standard Nystrom map sets that require them, but projection sheets can be—and may need to be—added to certain custom sets. Consult our customer service representatives for details.
A stand-alone roll-down projection screen is also available: a white sheet (64″ wide, 72″ high) on a spring roller with a backboard.
Installing Roll-Down Maps
Recap of General Information
When you order a roll-down map or map set, it comes on a spring roller with a backboard. The maps are attached to the spring roller, and the spring roller is attached to the backboard. You cannot safely attach a map backboard directly to a wall. Between the backboard and the wall, you need either a one-inch map rail or a map rack. Map rails also require map hooks.
Installing Map Rails and Map Racks
Written installation instructions come with all map orders. Customers may also access the online help videos on this page or phone customer service for support (800.421.4246). A professional installer can be sent to the site for a flat fee of $500.
Before installing your maps, choose your display site carefully. To provide for maximum visibility, the rail or rack should be installed at least six feet above the floor. Consider the play of light—especially sunlight—on the map location to minimize or avoid the problem of glare, and remember that sunlight moves with the seasons. If you choose to install a map rack, be aware that your maps must slide onto the rack from the side, so you will need a full map’s width of free space on at least one side of the rack.
You will need measuring tools, markers, hardware, a drill, and a ladder or preferably a scaffold. Determine where you will site your map and where you will need to drill holes. Mark the drill sites. Measure everything again before drilling.
Install map racks so the part that sticks out the most from the wall is at the top. At one side or the other of the rack, lift your map up, guide the backboard’s channel to one of the buttons on the rack, slide the channel over the button, slide the map along the button to the matching button on the other side of the rack, slide the channel over that second button, and finally center your map in the rack. It is best to work from bottom to top when placing maps on the rack.
If you are installing a map rail, notches in the rail must face down to permit insertion and removal of sliding hooks. Once the map rail is hung, you will need to place the two map hooks in the rail. Then lift the map, line up the openings in the backboard with the hooks, and hang.
Because the composition of classroom walls varies, Nystrom does not send you the hardware you need to attach your map rail or map rack to the wall. Please consult experts to determine the composition of your wall and the best hardware for your exact situation. The following recommendations generally work but do not apply to all situations.
- Wood Surfaces: Use #7 x 1″ flat head wood screws. Mark the location of each eyelet hole on the surface. Drill a pilot hole for each eyelet. Drill 1/4″ deep, using a 1/16″ to 1/8″ drill.
- Metal Surfaces: Use #7 x 1″ flat head sheet metal screws. Mark the location of each eyelet hole on the surface. Drill a pilot hole for each eyelet. Drill 1″ deep, using a using a 1/8″ to #30 drill.
- Plaster, Brick, Cement, or Cinderblock Surfaces: Use #7 x 1-1/4″ flat head wood screws. Mark the location of each eyelet hole on the surface. Drill 1″ deep using a 1/4″ drill. Fill holes with lead screw shields, size 1/8″ x 1″.
Using and Maintaining Your Roll-Down Maps
Always pull your map down from the center of its bottom edge. Never pull a map down by its corner. Each map, near its top, includes a STOP sticker. Once you see the STOP sticker, you should not pull your map any further.
If you have a set of multiple maps and want to reveal one of the maps hidden under the first sheet, reach up as you begin your downward pull. Separate the maps in front of the one you want to view, and roll them up and over and behind the roller while you continue pulling the rest of the maps down. The front maps will roll away from sight. If your maps are attached high on the wall, a ruler or yardstick can extend your reach. Again, this maneuver should be performed at the center of the map, never at a corner.
To retract a map, draw it down slightly and then slacken your downward pull. This allows the spring roller to pull up the map or maps. Mastering this motion can take a bit of practice.
It sometimes happens that your spring roller may release its tension, and you will find that your map won’t roll up. Our video tutorial shows a simple method for restoring tension. Before you begin, manually roll your maps all the way up on their roller. Then use a tool to wind the spring clockwise. Be sure to use our specialized tool, a crescent wrench, or channel lock pliers; please do not use hand-squeezed pliers. It is important never to let go or loosen your grip during the winding process, and hand-squeezed pliers too easily can slip. Once you have wound the spring to the desired tension, ease back slowly, allowing the spring to rotate counterclockwise about a quarter to half a turn until you feel it lock into place. Do not loosen your tool’s grip on the winding pin until you are sure the spring is locked.
|
No. of sheets |
No. of turns |
| 1 | 14 |
| 2 | 17 |
| 3 | 19 |
| 4 | 22 |
| 5–16 | 27 |
Three Choices for Mounting Globes
Nystrom globes come mounted three different ways:
The simplest and most economical option is the cradle mount, a simple ring upon which the globe sits. Cradle-mounted globes can be picked up and handed from student to student. This maximizes the quite literally hands-on engagement of students and makes it very easy to view the globe from every possible angle.
The gyro-disc mount is a desktop display. The globe is surrounded by a steel hoop attached to the globe at its north and south poles. The hoop is attached to a half hoop, also steel, and the half hoop is seated in a disc that supports the globe when it is placed atop a desk or table. Because the hoop swivels at its attachment points to the half hoop, this globe can also be observed from every angle, and its basic orientation reflects Earth’s 23° angle to the sun.
The caster-base stand sits on the floor and puts your globe on a pole that is based in a wide, well-weighted disc with wheels. The pole’s height adjusts from 26½” to 42″ high, and the globe sits within a gyro-disc mount atop the pole. Caster-base globes can be moved easily on any hard-surfaced floor, allowing you to roll your globe to whichever spot it is most needed.